- Shop from USA, UK, France, Germany & Turkey
- To Lebanon or any other country
- A Million Idea at your disposal
The Best Pieces To Score!There are 12 products.
You Won't Believe How Affordable This Selection Is!
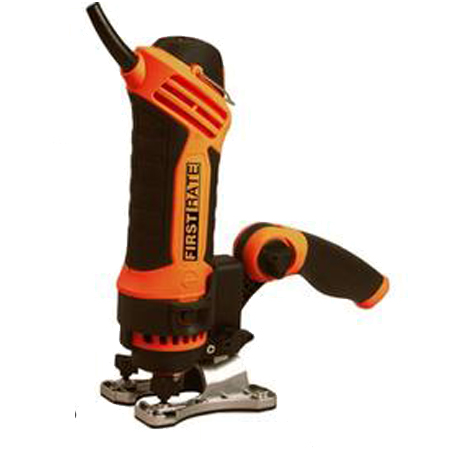

Home Improvement Saw
New
CUT THROUGH THESE


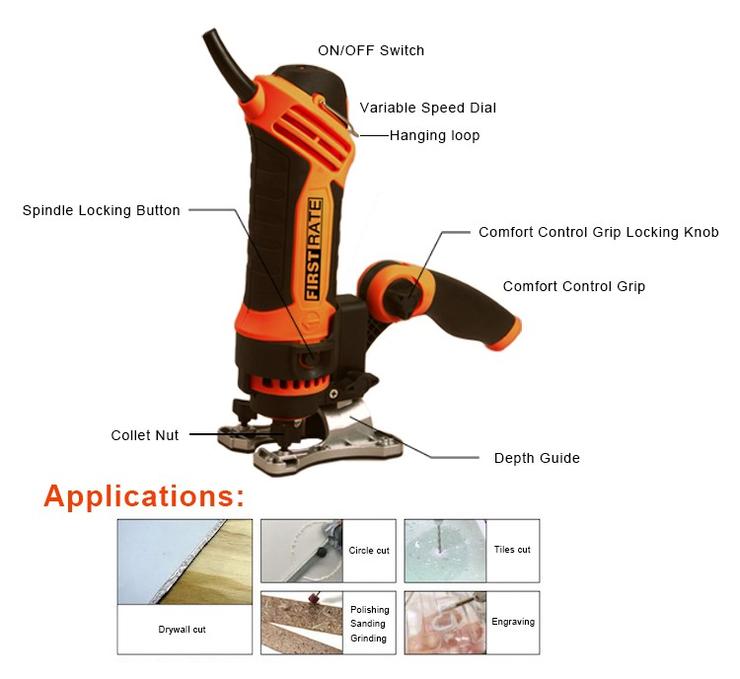
Features of twist a saw
- Multi-purpose handle and fence guide
- Unequaled precision and accuracy-cut freehand
- Plunge cut-no need to drill pilot holes
- Cut perfect circles the unique circle cutter
Usage
Turning the machine on and off
1.When the twist saw is connected to mains power the power indicator light glows GREEN .
2.The ON/OFF power switch (2) is located on the top of the electric router machine. To turn electric router machine:
ON, push the switch out .
OFF, push the switch in .
Changing the Variable Speed Dial
The Variable Speed Dial lets you change the speed that the bit turns in increments of 5,000 revolutions per minute (/min). The lowest setting is 5 (5,000/min) and the highest setting is 25 (25,000/min)
Tip: The harder the material, the slower the speed . Use slow speed for hardwood and hard materials. Use high speed for metal drill bits and grinding accessories.
1.To operate the electric router machine at its lowest speed, turn the Variable Speed Dial.
2.To increase the electric router machine speed, turn the Variable Speed Dial toward the ON/OFF switch . Maximum speed will be achieved at 25.
Making practice cuts
Practice cuts can help avoid costly and disappointing mistakes . Before undertaking your first electric router machine project, practice cut on scrap material that is the same as the material you will use for that project. This will help you select the speed that will produce the smoothest cut.
1.On scrap material, draw a guide or pattern similar to your intended project.
2.On scrap material, draw a guide or pattern similar to your intended project.
3.Fit the cutting bit into the collet.
4.Adjust the Depth Guide depth.
5.Set the Variable Speed Dial to the appropriate speed.
6. Hold the electric router machine firmly with both hands. Place the edge of the Multi-Purpose Handle foot on the workpiece at a 45° angle.
7.Turn the electric router machine on.
8.Hold the electric touter machine firmly with both hands. Place the edge of the Multi-Purpose Handle foot on the workpiece at a 45° angle.
9.When the bit has cut through the workpiece, slowly move the electric machine in a clockwise direction. Let it do the work, and use slow and steady pressure as you cut.
10.When you have finished the cut, switch the electric router amchine off. Wait until the electric router machine has come to a complete stop and then remove it from the workpiece.
Cutting outlet openings in drywall/plasterboard
1.Before installing drywall/plasterboard: Push any wires back into outlet boxes as far as possible to avoid cutting them when cutting the opening with the electric router machine. On the side facing you, mark the centre of the outlet on the sheet.
2.Fit the Multi-Purpose Handle and cutting bit.
3.Set the cutting bit depth so that it will extend 4mm past the thickness of the drywall/plasterboard.
4.Hold the electric router machine firmly with both hands and switch it ON.
5.When running at full speed, plunge the bit through the drywall/plasterboard on the mark showing the centre of the outlet box.
6.Slowly move the bit to the right until you feel and hear the bit touch the inside edge of the outlet box.
7.Tracing the inside edge of the box, move the electric router machineupward . Maintain light pressure on the box edge . As you feel the bit reach the top right corner, move it to the left.
8.Maintain light pressure on the box edge, and continue to trace counter-clockwise around the box until the shape is cut.
9.When you have finished the cut, switch it off. Wait until the electric router machine has come to a complete stop and then remove it from the workpiece.
Using the Circle Cutter
1.Mark the centre of the circle to be cut . Drill a Ø 4 .76mm (Ø 3/16”) pilot hole for the centre guide pivot pin .
2.Adjust the cutting bit so that it will extend 4mm (3/16”) past the thickness of the workpiece.
3.Loosen the pivot pin locking knob. Slide the locking knob to set the circle radius and re-tighten.
4.Place the edge of the Multi-Purpose Handle foot on the workpiece at a 45° angle . Align the centre guide pivot pin with the pilot hole .
5.Switch ON
6.When the motor is running at full speed slowly tip the electric router machine into an upright position and let the bit cut into the workpiece . Make sure the pivot pin enters and remains in the pilot hole.
7.When the bit has cut through the workpiece, slowly move the electric router machine in a clockwise direction Let the electric router machine do the work, and use slow and steady pressure as you cut.
Using the rotary tool attachment
1.Fit the correct cutting bit for your task into the collet.
2.Hold on to the rotary tool head, being careful not to touch the bit, and turn the electric router machine on.
3.Hold the electric router machine like a pencil to etch, grind or polish the workpiece.
Note: If you can, avoid laying the electric router machine on the workbench while working with the electric router machine. Use the hanging loop on the top of the electric router machine to hang the electric router machine higher than your workpiece. This enables a straighter the electric router machine rotary tool shaft, which means it will operate more efficiently. You also lessen the chance of the shaft overheating.
$140
